Tuesday, March 19, 2024

Coffee Tag for the Spring/Summer Coffee Lovers Hop


It's Tuesday — so you've got Kathi here to share a project with you. It's also the week of the Spring Summer Coffee Lovers Hop so as a coffee addict lover, I'm playing along. One of the sponsors of this coffee-themed hop is Topflight Stamps. who not only has oodles of coffee themed merchandise, they're a proud sponsor of the hop and will be giving away a prize!


Here it is!


Tuxedo Black Memento Ink by Imagine Crafts/Tsukineko was used to stamp the girl from the Coffee Break Clear Stamp Set 817 by Janet Klein for AALL and Create She was fussy-cut, colored with Copic markers, and set aside.

The larger tag die from the Taggletastic Die Set 30 by  AALL and Create was used to cut coffee-bean patterned paper from the Coffee and Chocolate Backgrounds 8x8 Paper Pad by Stamperia. The smaller tag die from the  Taggletastic Die Set 30 was used to cut splatter/coffee-ring/floral patterned paper from the Coffee and Chocolate Patterned 8x8 Paper Pad by Stamperia and another piece of the coffee-bean patterned paper. 

The pattrerned paper tags were edged with Pinecone VersaFine Clair Ink by Imagine Crafts/Tsukineko, then layered as shown. 

A piece of patterned paper, leftover from a previous project, was cut with the speech bubble die from the Taggletastic Die Set 30

A piece of low-tack tape was used to temporarily adhere the speech bubble die-cut to the scrap of paper, which was then secured to the base of a stamping platform. One of the sentiments from the Coffee Time Clear Stamp Set 417 by Janet Klein for AALL and Create was positioned face-down on the die-cut. The platform's lid was pressed onto the back of the stamp, the lid was lifted, the stamp was inked with Pinecone VersaFine Clair Ink by Imagine Crafts/Tsukineko, then stamped. The stamp was removed from the platform's lid and the same process was repeated with the coffee beans stamp.

Brown cardstock was cut slightly larger than the tag and a hole was punched in the center. The layered patterned paper tags were adhered to the cardstock tag. The fussy-cut girl and the speech bubble sentiment were adhered as shown. 

Multi-colored jute was threaded through the hole to finish the tag.

Please pop over to my blog, Kat's Tales of Stamping, for step-by-step instructions and complete supply lists. 

Topflight Stamps Products Used:


Thanks for visiting today! Don't forget to participate in the hop!

Monday, March 18, 2024

Vintage Miss You Cards

 Hello friends. Alanna here with a pair of cards today featuring the fabulous Typewriter set from Love in the Moon. To get started, I took the outer portion of the Round Arch stencil from Darkroom Door and blended on some peach ink. I cleaned off the stencil and then put it back over my blended area and stamped the typewriter image with Versafine Claire Nocturne ink

I love that this stencil set gives both the positive and negative portions. After my stamping was done, I took a couple of sentiments from the More Classic Sentiments set from Heffy Doodle and stamped them onto the "paper".

I then took the inner portion of the Round Arch stencil and stamped the circle and stars image which is from the Birthday Wishes set from Visible Image. I stamped it with the Peach Terracotta ink pad from Spectrum Noir. This ink is part of their Shimmer Gold Pearlescent ink collection which are all so pretty!

To finish off these cards, I rounded the bottom corners. 

Find all the products I used below in the Topflight Stamps store. Crafty hugs! ~ Alanna

Friday, March 15, 2024

Spring Summer Coffee Lovers Blog Hop 2024


Topflight is so excited to be a part of the 2024 Spring / Summer Coffee Lovers Blog Hop. It wouldn't be a blog hop without a chance to win great prizes. Read below for information on the hop and how you can enter to win $25 gift card to the Topflight Store.

Ericka here and today I created a coffee mixed media card using the Darkroom Door Coffee Time stamp along with the Stamperia 8x8 Coffee & Chocolate paper pad with a little bit of PaperArtsy Fresco Acrylics and washi tape for interest.
 

The Coffee Time stamp is one of my favorites and I love the large cups included in the set. This new Stamperia paper pad is so fun they have a couple more designs in the store for great backgrounds or ephemera. 


You can check out all the coffee papers, stamps, and stencils in the store you can check them out here.


Make sure to hop along with us all on the Coffee Loving Cardmakers blog HERE. There are so many fun prizes that you will not want to miss. 


The hop is from Friday, March 15 - 22, 2024, so make sure to leave a comment below by March 22nd midnight EST for a chance to win a $25gift card to the store.

You are invited to the Inlinkz link party!

Click here to enter

Thursday, March 14, 2024

Succulents Washi Tape Card

    Hi Everyone,

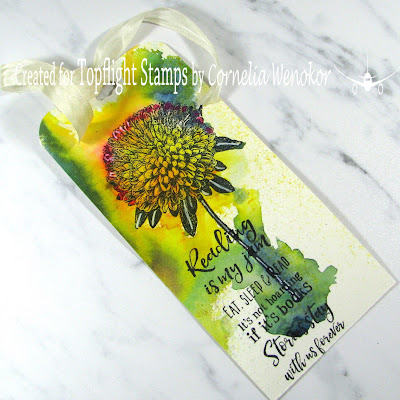
Cornelia here today. This week's theme is all about Washi tape on the Topflight blog
I discovered this awesome Washi tape in the store. It is from AALL&Create and you can piece it together to create a picture, or use it as you normally would. I recently made another card that you can see HERE.
This tape is called Thriving Terrarium. I pieced it together on a regular card stock base. Brushed the edges with black distress ink. Trimmed the card and mounted it onto black card stock.Added sticker sentiments.
.
I hope you liked this. Thanks for visiting. 
See you next week with more Topflight Stamps inspiration.

And here are the stamp supplies I used: 
(this one is sold out right now, but perahps you can find a different one that you like)


Wednesday, March 13, 2024

AALL & Create Washi

Hello Crafties, Mary Key here along with my Team Members creating with "Washi-Tap" this week. 

I will be using AALL & Create stamps, die and washi-tape. Products I will be using are AALL & Create Wishy-Washi Tape #19 Janet Klein, #24 Moon Stars Die (no longer in Topflight Stamps), #481 Lil Love, and #748 Add A Motto along with Lavinia Dinkles Paynes Grey.

I used watercolor paper for my background and also to color #481 Lil Love image. First I used some leftover white cardstock and used #19 Wishy-Washi Tape and filled my cardstock which looks like this:

I then started with Lavinia Dinkles and just used a little and spritz some water to my mat and smooshed my watercolor paper onto Paynes Grey, until I get it to where I like how it looks and then heat dry. 

I then used #24 Moon Stars diecut onto my #19 Wishi-Washy panel and diecut. After finish watercoloring my image, I then stamped onto white cardstock and used #748 Add a Motto which is the stamp that says "Powered by Starts" sentiment and used Versafine Onyx Black ink.

I then assembled my pieces onto white cardstock and done! Here is my finished card.


Thank you for stoping by and keep creating!

Topflight Stamps Supplies Used:


Tuesday, March 12, 2024

Fun with Washi Tape!

 It's Tuesday, which means you have Kathi here to share projects with you. This week my teammates and I are showcasing Washi TapesTopflight Stamps has a wide variety of Washi Tape by AALL and CreatePen Paling PaulaStampamLeane Creatief, and Studio Light.

I opted to use Free the Birds Washi Tape 75Heritage Scroll Washi  Tape 76, and Prickly Blooms Washi Tape 69 -- all by AALL and Create to create two cards and a tag. These three tapes can be layered together to create larger images, which is exactly what I did. Then I took it a few steps further by adding multiple layers of clear embossing powder to one of the images and adding a crackle medium to another. 

Here they are!

A2 Card


A6 Card


Tag


All three projects were started the same way. Strips of  Free the Birds Washi Tape 75 by AALL and Create and the Prickly Blooms Washi Tape 69 by AALL and Create were adhered to lightweight white cardboard (leftover from packaging), taking care to line up the images so that they formed a cohesive image. 

The image panel for the top card was adhered behind an ornate frame die-cut and set aside. Pieces of Heritage Scroll Washi  Tape 76 by AALL and Create were layered onto green cardstock. The panel was trimmed to 4" x 5.25" and plattered with sparkly gold re-inker mixed with alcohol. The edges of the image panel were distressed with a scissor blade, then edged with the the gold ink. 

Nocturne VersaFine Clair Ink by Imagine Crafts/Tsukineko was used to stamp the sentiment onto green cardstock and heat set with gold embossing powder. Dies from the Taggletastic Die Set 30 by AALL and Create were used to cut the sentiment and mat it. A border die from the Frayed Frames Die Set 26 by AALL and Create was used to cut green cardstock. The sentiment die-cuts and the border were all edged with gold ink. Then the card was assembled as shown.

Here's a close-up of the stamped and embossed Washi Tape Image


For the A6 card in the middle above, Nocturne VersaFine Clair Ink was used to stamp the Shattering #713 Clear Stamp Set by Bipasha BK for AALL and Create onto the second scene built with the Free the Birds Washi Tape 75, then heat set. When dry, a VersaMark pad was smooshed onto the image panel, clear embossing powder was added, the excess was dumped off, and the panel was heat set. This was repeated four times to build a thick layer of clear, shiny embossing powder. The embossed image panel was trimmed, adhered to black cardstock, then a brown frame die-cut was adhered overtop. Patterned paper by Studio Light was cut with the largest die from the Passe Partout Essentials Rectangle Die Set by Studio Light and edged with Acorn VersaFine Clair Inks by Imagine Crafts/Tsukineko.

Here's a close-up of the crackled Washi Tape Image


For the tag, the scene created with the Prickly Blooms Washi Tape 69 by AALL and Create was sealed with Matte Medium. When that was dry, a thickish layer of a crackle medium was applied and allowed to dry. When dry, black Distress ink was rubbed into the crackle to enhance the look.

Pale grey cardstock and black cardstock were cut with the tag die from the Taggletastic Die Set 30 by AALL and CreateNocturne VersaFine Clair Ink was used to stamp the numbers from the Reckoner Clear Stamp Set onto the tag. The ink was heat set, then several layers of Distress ink were sponged over the tag. Silver, black, and rust paint pens were used to splatter the tag.

The black tag was trimmed and used to mat the crackled image panel. The tag was edged with a silver leafing pen. Dies from the  Taggletastic Die Set 30 were used to cut black and grey cardstock. Nocturne VersaFine Clair Ink was used to stamp the "tweet" sentiment onto a black die-cut which was then heat embossed with silver embossing powder.  The tag was assembled as shown. Silver gemstones were used to finish the tag.

Please pop over to my blog, Kat's Tales of Stamping, for more information!

Topflight Stamps Products Used:


Thanks for visiting today!

Monday, March 11, 2024

Washi Tape as the Star

 Hi friends. Alanna with you today sharing a fun birthday card where some fabulous washi tape is the star of the show. 

To get started, I took the Presents & Cupcakes washi tape from Leane Creatief and added several rows of it to a piece of white card stock. I trimmed the panel down to trim everything up. I matted this panel onto a piece of black card stock which was then added to a white A2 notecard.

I stamped the large birthday sentiment from the Birthday Wishes set from Visible Image onto a scrap piece of white card stock. I then added a sub-sentiment from the More Classic Sentiments set from Heffy Doodle. I trimmed this panel down and added more card stock behind it to add dimension. 

I decided it was getting a little lost on the background, so I took a red Copic marker and went around the edges with it. This added just enough color to help provide some lift. Some red gems from my stash finish off this card.


Find these products I used in the Topflight Stamps store below.

Crafty hugs! ~ Alanna

01 09 10